
3.4.2 Making New Article in Joomla
Filed Under ( Joomla, PHP, Programming, Technology, Tips, Tutorial ) by admin on 23-12-2009
Tagged Under : easy learn joomla programming, Joomla, joomla code Category: PHP, joomla programming
Beneath are the steps in making new article in Joomla!:
1. Open Article Manager through Content > Article Manager.
2. Click the New icon in the upper toolbar.
3. You will get the form to write the article. Here are the items in the form:
-Title: Type the title from the article which will you made.
- Alias: The text that you are written in this field will be publicated in url if you choose to optimize the URL for search engine.
- Section: Choose section from the available list.
- Category: Choose one category from the available category list. This category list depends from the section that you have been chose.
- Published: Confirmation whether you want to publish this article or not.
- Front Page: Does the article is published in the front page or not.

Picture 3.51 The form of the making new article
Next, type the article text in the textarea:
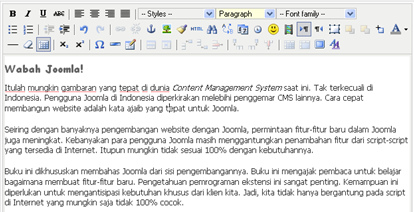
Picture 3.52 Textarea to input the text article
After typing the article text, give attention to the article parameter. There are 3 parameters group. There are Parameters – Article, Parameters – Advanced, and Metadata Information.
Parameters – Articles
Beneath are the options for this parameter:
- Author: Choose the article writer/author.
- Author Alias: You get a chance to write the penname from the writer.
- Access Level: Choose the minimum access level that is allowed to read/to access this article.
- Created Date: Establish the making date of this article.
- Start Publishing: Establish the starting date of this publication article.
- Finish Publishing: Establish the ending date of this publication article. If there is no ending, just type Never.
Picture 3.53 Parameter - Article
Parameters – Advanced
Beneath are the options for this parameter:
- Show Title: To publish or to hide the article title.
- Title Linkabe: The title in your article made becomes link into the actual article.
Picture 3.54 Parameters - Advanced
- Intro Text: Publishing or hiding the text intro.
- Section Name: Publishing or hiding the section name where the article is overshade.
- Section Title Linkable: Does the section name that appears have link into the section page.
- Category Title: Publishing or hiding the category name in article.
- Category Title Linkable: Does the category name have link into the category page.
- Article Rating: Publishing or hiding rating in the article.
- Author Name: Publishing or hiding the article’s writer name.
- Created Date and Time: Publishing or hiding the date and the time making of the article.
- Modified Date and Time: Publishing or hiding the date and the time making of the last article.
- PDF Icon: Publishing or hiding the PDF button. By arising of this button, the visitor can see the article in the well-printed format.
- E-mail Icon: Publishing or hiding the email button. By publishing this button, the visitor can reference this article into their partner.
- Content Language: Choose in what kind of language this article is written. It is very beneficial if your site supports the multi language.
- Key Reference: A key that can be used as reference for this article.
- Alternative Read More Text: You can change the Read More text with another text that you want.
Metadata Information
The information that will be put in the HTML header:
- Description: The text that you are input in here will become meta description in the HTML header.
- Keywords: Input the keywords that are relevan with this article. Use comma to separate the keywords.
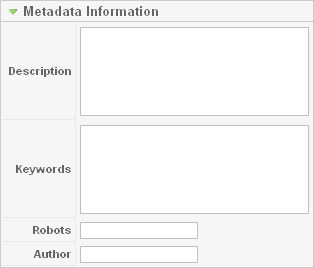
Picture 3.55 Metadata information for article
- Robots: Type keyword for Robots
- Author: The writer’s name which will be entered into Meta information.
4. Click Save to save it.
You have been success in making the new article. Certainly, you can guess on how to format/to beautify your written text appearance by seeing toolbar in the textarea. There are some of the things that I want to share related with the article inscriptive.
Insert Image
You already have/upload the picture in Media Manager. You can wielding the picture and insert it in your written text. Here are the steps:
1. Place cursor in the position where you want to insert the picture in the article text.
2. Click the Image button in the upper article.

Picture 3.56 The buttons under textarea
3. You will get the dialog box as in the picture 3.57.
Picture 3.57 The choosing picture dialog box
Choose the picture that you want to insert. Click the picture.
4. Click the Insert button in the upper right. The picture will be arisen in the article textarea.
To modify the picture property, you can click the image button in the toolbar textarea. After clicking the image button, then you can get the dialog box as in the picture 3.58.
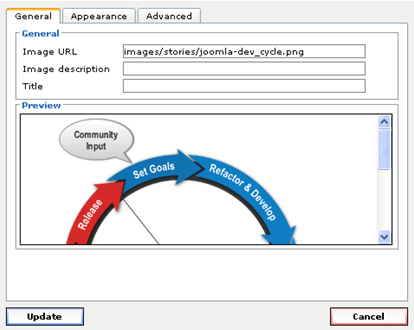
Picture 3.58 Dialog box to change the picture’s property
There are 3 tabs that is General, Appearance, and Advanced. Here are the tabs explanations:
General
Organize the general property in the tag img HTML.
- Image URL: Definite the picture storage location.
- Image description: The explanation about the picture.
- Title: The title or the picture’s name.
Appearance
Organize the property that is related with the picture’s appearance.
- Allignment: Establishing the picture position toward.
- Dimensions: Establishing the picture size in pixel.
- Vertical Space: Vertical space in pixel.
- Horizontal Space: Horizontal space in pixel.
- Border: Giving margin toward the picture in pixel.
- Class: Relating the picture with the certain class name.
- Style: Inserting the embedded style sheet toward the property image directly. Look at the picture 3.59.
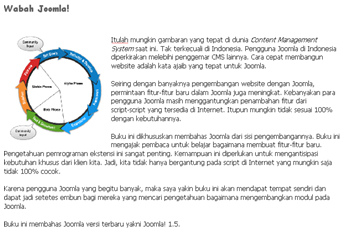
Picture 3.59 The result of the inserting picture
Related posts: