
3.2.4 Joomla Global Configuration
Filed Under ( Joomla, PHP, Programming, Technology, Tutorial ) by admin on 28-09-2009
Tagged Under : easy learn joomla programming, Joomla, joomla code, joomla programming
Global Configuration is the page that is used to manage the variables value in configuration.php file. In the picture of 3.15 shows any kind of the variable group that can be managed in the Global Configuration.
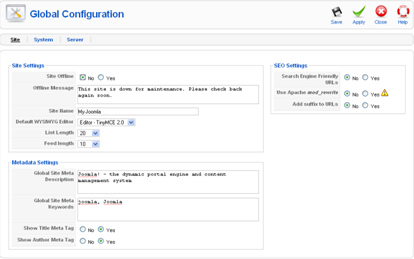
Picture 3.14 Global Configuration page
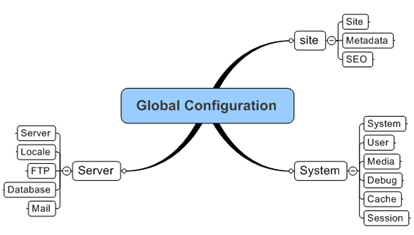
Picture 3.15 Mind map global configuration
Site Settings
- Site offline: If you want to make any changes to the website, you can inform this thing into the visitor. Choose the yes item in this field.
- Offline message: Write your message into the visitor in this area. The message will appear when your website is in the “offline” condition.
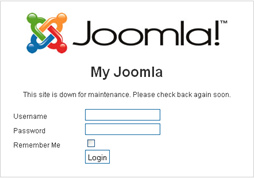
Picture 3.16 Website in offline position
- Site name: The name of the website that you are already set in the time of installation.
- Default WYSIWYG editor: By default, Joomla! use Editor TinyMCE 2.0. It is very beneficial when you are entering the information. You do not have to type the HTML code, but you only have to use toolbar in the editor. You can see the editor appearance in the picture 3.17.

Picture 3.17 Editor TinyMCE 2.0
- List Length: It is the amount of article/news/link that will be showed in the control panel for all user.
- Feed Length: The amount of item/article that is showed in feed.
Meta Data Settings
Generally, Metadata can be interpreted as data of the data or for the easiest interpretation; it is called as information or explanation about our website. This metadata is very influence of the searching engine such as Google, Yahoo!, etc.
Metada is written by using XHTML. You can see its sample as the following:
| 1 | <meta http-equiv=”Content-Type” content=”text/html; |
| 2 | charset=utf-8″ /> |
| 3 | <meta name=”robots” content=”index, follow” /> |
| 4 | <meta name=”keywords” content=”joomla, Joomla” /> |
| 5 | <meta name=”description” content=”Joomla! - the dynamic |
| 6 | portal engine and content management system” /> |
| 7 | <meta name=”generator” content=”Joomla! 1.5 - Open |
| 8 | Source Content Management” /> |
| view plain | print |
<meta http-equiv="Content-Type" content="text/html;   charset=utf-8" />
<meta name="robots" content="index, follow" />
<meta name="keywords" content="joomla, Joomla" />
<meta name="description" content="Joomla! - the dynamic   portal engine and content management system" />
<meta name="generator" content="Joomla! 1.5 - Open   Source Content Management" />
Fortunately, we do not have to type the code like that. We just only need to decide its configuration in Joomla!
- Global Site Meta Description: This is the explanation/description from website. This description oftens arisen by the search engine. That is why you should give serious attention to the written text in this description. The compatibility text that is written here with the content in web will establish your site visitors” satisfactions.
- Global Site Meta Keywords: In this field, you will be asked to fill the keyword which appropriates with the web theme/content. Keyword is very important. You can enter the keyword lists which have the concept compatibility with the web content/theme. Usually, the search engine will index the keyword. You can enter more than one keyword that is separated with comma (,).
How many keyword that can be entered? There is no absolute standard about this. But possibly, you should enter less than 1000 character in order to get read by search engine. Entering less keyword but it has the high compatibility; possibly, it can get priority in the “heart” search engine eventhough it is not guaranty yet.
- Show Title Meta Tag: In every page, the title will be merged in the meta tag.
- Show Author Meta Tag: Shows the author”s name/writer in each page.
Actually, the problem of this meta data is very crucial in the web making. That is why, I suggest you to learn about this further. You can read the books or the articles in the Internet that is discussed about Search Engine Optimization.
SEO Settings
SEO is the abbreviation of Search Engine Optimization. This area is used to optimize you website in order to fulfill the “demand.” In this case, we will arrange the web URL format so that it is easy to find by the search engine.
- Search Engine Friendly URLs: This item asks whether you are going to optimize URL for search engine or not. The example of the URL that cannot be optimized:
http://localhost:8050/myjoomla/index.php?option=com_content&view=article&id=24:content-layouts&catid=29:the-cms&Itemid=38
Here are the URL that is already optimized:
http://localhost:8050/myjoomla/index.php/content-layouts/29-the-cms/24-content-layouts
- Use Apache mod_rewrite: If you choose yes, then we will involve the apache module named mod_rewrite in optimizing the URL. You have to activate the mod_rewrite module in Apache first. Then, change httaccess.txt in the Joomla! directory into .httaccess.
- Add suffix to URLs: Will adding suffix (.html) into every URL.
System Settings
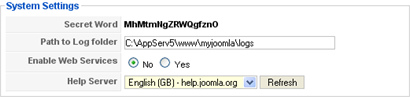
Picture 3.18 System Settings
The arrangement that is involved into this group is:
- Secret World: The text that is produced automatically and random in the time of installation. It is related to the security.
- Path to Log Folder: Establish the log directory/location.
- Enable Web Services: Enable the using of the web services.This function is used if there is third party that needs it. If you want to know about the detail of the web services in PHP, you can read the book of Building the Web Services Open Source Using PHP that is written by the same writer of this book.
- Help Server: Establish the aid source whether it is from help.joomla.org or from the local computer.
User Settings
This area is related with the user management arrangement:
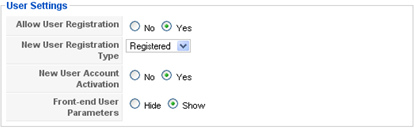
Picture 3.19 User Settings
- Allow User Registration: Are you allow the visitors in doing the registration to become member/user? If yes, then there is a link that appears in the form login for registration.
- New User Registration Type: When the visitors are doing the registration, you can enter the user into the group that you want. You can choose the group in here as the default group for the new user.
- New User Account Activation: If you choose yes, then the user will receive an email link in order to the activation before login.
- Front-end User Parameters: In confirming whether the user can choose language, editor, and help site preference in the time they are login.
Media Settings
This area is related with the files management that can be uploaded or downloaded.
Picture 3.20 Files management
- Legal Extensions (File Types): The file types that is allowed to be uploaded. If more than one files type, each of the extensive is separated by comma (,).
- Maximum Size (in bytes): The total maximum sizes that can be uploaded in once upload. If you do not want to limit it, fill with zero mark (0).
- Path to Media Folder: Path into the media storage folder or files that can be accessed through Media Manager.
- Path to Image Folder: Path into the entire picture files storage folder. This should be a subfolder in the Media folder.
- Restrict Uploads: If you choose yes, the users that the access right unders the Manager cannot be uploaded.
- Check MIME Types: If you choose yes, Joomla! will use MIME Magic or Fileinfo in verifying the files. But if the verification process is error, it is better for you to ignore this feature (choose “no”).
- Legal Image Extensions (File Type): The picture files type that allows to be uploaded. If more than one type, you can use comma (,) in order to separate each extension.
- Ignored Extensions: The extension that you do not want to check or to verify.
- Legal MIME Types: The MIME type list that can be used for upload. Use comma in separating each types.
- Illegal MIME Types: The MIME type list that is not allowed for upload. Use comma in separating each types.
- Enable Flash Uploader: Choose whether the flash uploader will be used or not in uploading the media in the Media Manager.
Debug Settings
This arrangement is related whether you want to show the error message or not.
- Debug System: If you choose “yes”, the error message of diagnostic information, the translation language, and the sql will be shown. These informations will be shown in every lower part page that you see. Thus, it is better for you to choose “no” if your website onlines in the Internet. Use this only in the local computer.
- Debug Language: Choose whether the debugging indicators of (”"”) or (?…?) for the Joomla! language file will be shown or not. This debug stills keep working without activate the debug system, but you will never get the detail reference that is probably beneficial for you.
Picture 3.21 The management area of the debug appearance
Cache Settings
This Cache is very beneficial in order to increase your website performance. So, you do not have to upload the data in everytime. By decreasing the database load, then it will decrease the loading time that feels by the visitors. Cache will be beneficial if your website rares to be updated but you have a lot of visitors.
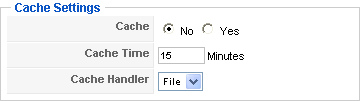
Picture 3.22 The cache management area
- Cache: Whether you want to use cache or not.
- Cache Time: How long the cache will be kept before it is going to be refreshed.
- Cache Handler: The cache mechanism. Currently, there is only the cache mechanism with the file based.
Session Settings
Every user login, there is a note. Joomla! will count on how long the user do not do their activity since its last activity. This record-keeping is in the session.

Picture 3.23 Session management
- Session Lifetime: How long that the session will be valid. It counts since the last activity.
- Session Handler: The session identification mechanism.
Server Settings
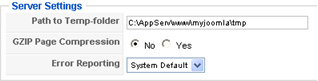
Picture 3.24 Server management
The arrangement that is related with server as the following:
- Path to Temp-folder: Definite the temporary folder location.
- GZIP Page Compression: If support, you can compress the buffer output.
- Error Reporting: Choose the mistake report level that arises.
Local Settings
Choose the time zone that is used by your site.
FTP Settings
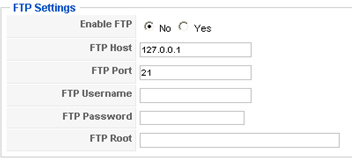
Picture 3.25 FTP management
This area is used to arrange the access through FTP. The items that is arranged:
- Enable FTP: In establishing whether you are allowing the access using ftp.
- FTP Host: Host that will be accessed. It can be IP or host name.
- FTP Port: The port number in accessing FTP. The standard that is used for FTP is using port 21.
- FTP Username: Username that is used to access FTP.
- FTP Password: Password that is used to access FTP.
- FTP Root: The root location when FTP is being accessed.
Database Settings
The database arrangement variable values are already definition in the time of installation. But, you can still change it in this area. The only one thing that you should remember is that you have to be carefull in changing the values. If not, your website cannot be accessed.
Picture 3.26 Database access management
- Database Type: The database type that is used. Most of us using mysql.
- Hostname: Host name for the database.
- Username: Username for accessing the database.
- Database: The database name for the Joomla! website which we used right now.
- Database Prefix: Prefix that we add into every table in the database. By the presence of prefix, we can use one database for more than one website.
Mail Settings
This area is used for arranging the values that is related with the email delivery. The email delivery happens in the time of the user registration confirmation and etc (it depends on the module that you use).
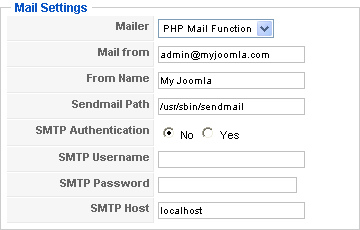
Picture 3.27 The email sending management
- Mailer: The email delivery mechanism choise. By default, it is using the email delivery function in PHP.
- Mail from: The address that is used as sender.
- From Name: The name that will be noted as sender.
- Sendamail Path: The sendmail programme directory location that is already server in it.
- SMTP Authentication: If your SMTP Host asks the authentication, choose “yes”.
- SMTP Password: Type the password.
- SMTP Host: Enter host name of SMTP.
You are already known about the detail of Joomla! configuration. Then, you can practice your knowledge about Joomla! administration. Of course, it is better for you to do this in the local computer.
The configuration that we have been discussed very affects your website totally. The knowledge about this configuration will be very beneficial when we are trying to develop your own module/component.
Related posts:
Rakib Bhai,
It’s Really Nice…
Thanks