adsense Browser CSS easy learn joomla programming Fix google Hacks Javascript Joomla joomla code joomla programming MySQL PHP Programming secret speed Technology Template Tips Tricks Tutorial Video Vista Windows

Windows Vista Tips: There is no script engine for file extension “.vbs”

Filed Under ( Hacks, Technology, Tips, Tutorial, Windows Secret ) by admin on 25-02-2009

Tagged Under : , , ,

If you received an error saying There is no script engine for file extension “.vbs” then you may have an incorrectly registered VBScript dll.

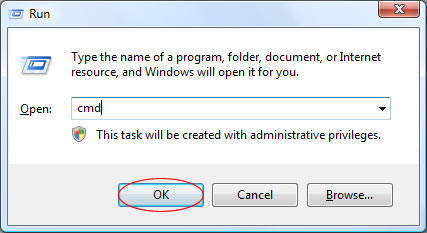
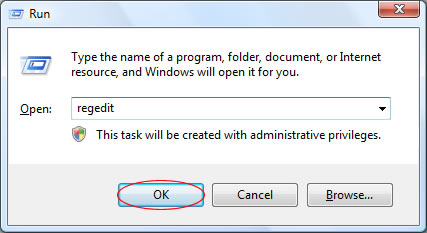
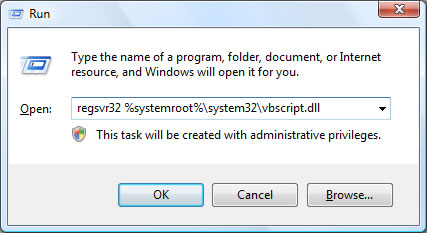
This is easily fixed by re-registering the VBScript DLL file, by loading the Run box (Press WINDOWS KEY + R to access this) and running the following command:

regsvr32 %systemroot%\system32\vbscript.dll

Run

If this is completed successfully, you’ll receive the following message:

“DllRegisterServer in C:\Windows\system32\vbscript.dll succeeded.”

Run

Windows Vista Tips: Multimedia Audio Controller Driver

Filed Under ( Hacks, Technology, Tips, Tutorial, Windows Secret ) by admin on 25-02-2009

Tagged Under : , , ,

Some users of Windows Vista may have sound problems, along with an unknown hardware item in the Device Manager called “Multimedia Audio Controller”. This means that you do not have Vista compatible drivers for you sound card, causing audio problems.

Solving this problem should be easy, assuming you know which sound card you have or have the driver disk.

  • If you have a driver CD that came with your computer or sound card when you bought it, insert this to install the latest drivers.
  • If you no longer have the CD, or the drivers are too old you will need to download the latest sound card software from the manufacturers website.

To simplify your search, many of the major sound card drivers for each company are located on the following websites:

Windows Vista Tips: Repair Corrupt Vista Files

Filed Under ( Hacks, Technology, Tips, Tutorial, Windows Secret ) by admin on 24-02-2009

Tagged Under : , ,

Some Windows Vista errors are caused by corrupt system files causing instabilities, but troubleshooting these problems manually can be almost impossible. Thankfully, Vista includes a “System File Checker” application that will verify the integrity of core system files.

There are 2 types of scan, a verification and a scan/repair mode. The former will only check the files without repairing them automatically, the latter will fix any errors it finds.

To begin, load the command prompt by starting “cmd” from the run box (Press WINDOWS KEY + R to access this):

Run

Then, type in one of the following commands (followed by the enter key) depending on the type of scan you wish to perform:

  • sfc /verifyonly - To verify any corrupt files only.
  • sfc /scannow - To verify and fix any corrupt files.

This will then start the scan and inform you of any files that require fixing:

Windows Vista Tips: ReadyBoost

Filed Under ( Hacks, Technology, Tips, Tutorial, Windows Secret ) by admin on 20-02-2009

Tagged Under : , ,

Windows Vista has introduced a clever new caching system that can take advantage of your existing high-speed storage devices (such as USB Drives and Memory Cards). This should boost performance when performing disk intensive tasks. Some flash memory devices are up to 100x faster than a standard hard disk, so it makes sense to use these to cache common files.

ReadyBoost works with SuperFetch to store information that can be accessed quickly from the cache on startup, rather than relying on slower reading from the hard disk.

There are several requirements that your flash memory device must meet to be used as a ReadyBoost device:

  • At least 256 MB in size
  • Access time of < 1ms
  • Capable of 2.5 MB/s read speeds for 4 KB random reads spread uniformly across the entire device and 1.75 MB/s write speeds for 512 KB random writes spread uniformly across the device
  • At least 235 MB of free space.

It is recommended that you have between 1-3 times the amount of ReadyBoost cache as physical RAM. However, ReadyBoost devices are limited to 4GB max.

Assuming you meed the minimum requirements, plug your device in to a USB 2.0 port and wait for a Windows Autoplay dialog box to pop up. Select the Speed up my PC option from this menu.

Autorun

You can then set the amount of space on the device that you wish to allocate to ReadyBoost (you may as well use the maximum possible, up to the 3x RAM recommendation). If your device is not compatible or is too slow, you will be informed of the reasons at this point.

Autorun

Users with low amounts of system RAM (512MB - 1GB) will notice the biggest performance increase, and those with 2GB or more may only notice marginal gains.

Windows Vista Tips: Reliability and Performance Monitor

Filed Under ( Hacks, Technology, Tips, Tutorial, Windows Secret ) by admin on 16-02-2009

Tagged Under : , ,

Windows Vista contains an advanced reporting tool called the “Reliability and Performance Monitor”, which allows you to check your system for any performance and reliability problems from the system logs and real-time monitoring.

Tips, advice and technical details of many problems that could be effecting your system are all generated within 60 seconds. It is surprisingly useful, even for advanced users.

To start the application, load “perfmon /report” from the run box (Press WINDOWS KEY + R to load this):

Run

The Reliability and Performance Monitor will then spend 60 seconds analysing your computer:

Reliability and Performance Monitor

Once the testing is complete, the tool provides a list of all of the problems and relevant notices about your PC. It is worth reading through the list to see if there are any serious problems that you should rectify. An example report is shown below:

Reliability and Performance Monitor

Most advanced users will be able to track down the problems and improve the overall performance and/or reliability of the operating system.

Windows Vista Tips: Disk Defragmenter

Filed Under ( Hacks, Technology, Tips, Tutorial, Windows Secret ) by admin on 16-02-2009

Tagged Under : , ,

Windows Disk Defragmenter is a handy tool that may help you gain some extra performance from your PC. When Vista writes to your hard drive the bits of information that make up a file can be spread all over the disk (this is called fragmentation).The “defrag” tool will try to join up all of the parts that makes up files so that they are in the same location, decreasing the time it takes to find all of the parts.

To load Windows Defrag, run dfrgui.exe from the run box (Press WINDOWS KEY + R to load this). In this window you can choose to “Defragment Now” if you wish to perform this operation now, or alternatively you can schedule a time for your PC to defrag automatically (ideally when you are not using your PC):

If you click the button to defrag immediately, you will be informed that this is in progress but there is no graphical indicator like in previous versions of degrag.

Windows Vista Tips: Vista Slow Network

Filed Under ( Technology, Tips, Tutorial, Windows Secret ) by admin on 11-02-2009

Tagged Under : , ,

Windows Vista has been known to cause slow network transfer speeds for some users, most noticeable when copying files across a network that take much longer than before.

Some suggestions that may help users experiencing slow network performance are as follows:

1) Download the latest drivers for your network adapter from the manufacturers site (do not rely on the Windows Update drivers). Then, check they are configured properly by viewing the device manager settings.

2) Install the latest Windows Update patches, including Vista SP1.

3) If you use a 3rd Party firewall, be sure that it is configured correctly. For example, in Kaspersky Internet Security there is a “high speed” setting that should be ticked.

4) Try disabling Remote Differential Compression by clicking Start > Control Panel > Programs > Programs and Features. Then click Turn Windows features on and off, untick Remote Differential Compression and click OK:

5) The final thing to try would be to disable network Auto-Tuning. First, load the run box by pressing WINDOWS KEY + R and then run:

netsh interface tcp set global autotuninglevel=disabled

You will need to restart your PC after this and retry the network transfer. If speeds are still low, you can return the auto-tuning to default mode by re-running the following command:

netsh interface tcp set global autotuninglevel=normal

Windows Vista Tips: Increase Menu Speed

Filed Under ( Hacks, Technology, Tips, Tutorial, Windows Secret ) by admin on 11-02-2009

Tagged Under : , ,

Windows Vista has a built in menu delay setting so that it waits a certain length of time when you hover over a menu item before expanding the further options. For most users this is fine, but power users may find the wait rather annoying and would rather have instant menu opening speeds on mouse over.

A simple registry tweak will allow you to speed up the menu. First load the registry editor by launching regedit from the Run menu (Press WINDOWS KEY + R to access the run menu):

Registry Editor

Then, navigate to HKEY_CURRENT_USER\Control Panel\Desktop in the side panel, then right click on MenuShowDelay and select Modify:

Increase Menu Speed

Now, enter the menu delay time in milliseconds (1 is near instant, do not enter 0!) and press OK:

Registry Editor: Edit String

Once you have restarted your menus will slide at near instant speeds. The default setting is 400 should you wish to restore the default menu setting.